- Introduction
- Accessibility Features of Dreamweaver
- New accessibility prompts (if enabled)
- Accessibility reporting
- Accessibility reference
- Accessible authoring interface
- Creating Accessible Content
- Alternative text for images
- Form labels
- Data table accessibility
- Frame titles
Introduction
Adobe Dreamweaver CS6 (latest version) is one of the most popular and powerful web development applications available today. It is popular for a few reasons:
- Its WYSIWYG (What you see is what you get) interface allows you to create a web page without looking at the code. If you are new to web Design, this can be especially inviting.
- The HTML code created in the WYSIWYG interface tends to be cleaner and more compliant with W3C HTML and XHTML specifications - external link than code created with other tools. Standards compliant code is usually more accessible more compatible with emerging and assistive technologies.
- You can make changes manually, or in the Code view, without worrying that Dreamweaver will change your code back. This feature has really set Dreamweaver apart from other web development applications.
- It integrates smoothly with other Macromedia tools, especially Flash.
Accessibility Features of Dreamweaver
Many of the features mentioned in this article are only available in the most recent versions of Dreamweaver. If you are using Dreamweaver 4 or earlier, many of the features mentioned below will not be available, or will not be as complete.
- New accessibility prompts (if enabled)
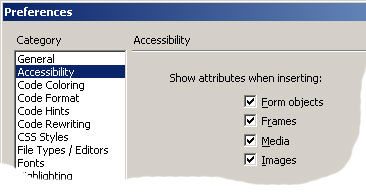 Dreamweaver allows developers to be prompted when inserting certain web elements that may need accessibility attributes added to them. Unfortunately, these options are disabled in the preferences by default.
By default, the accessibility options are disabled in Dreamweaver MX. To enable the accessibility features of Dreamweaver MX 2004, select Edit > Preferences > Accessibility and then check the boxes for Form objects, Frames, Media, and Images.
Once selected, Dreamweaver will display a prompt for accessibility features when each of the identified elements are inserted into a document.
- Accessibility reporting
Dreamweaver can validate against common accessibility standards and give feedback regarding the accessibility of web content. The reports can be accessed by selecting Site > Reports.
- Accessibility reference
- Accessible authoring interface
Among the other reference materials included in Dreamweaver, there is an Accessibility Reference. The reference materials were provided by UsableNet. Unfortunately, the reference is quite technical in nature and not very helpful unless you are already familiar with HTML and accessibility techniques in general.
Most of the dialogs, menus, and other interface elements are accessible to screen readers.
Creating Accessible Content
In order for accessibility prompts to display in Dreamweaver:
1. The accessibility preferences must be enabled
2. You must be in Design view in the interface. If you are in the Code view or the code window has the cursor focus when you insert elements, the accessibility prompts will not display.
- Alternative text for images
With the accessibility options enabled in the preferences, Dreamweaver now prompts the user for alternative text when an image is inserted into a document.
Type the appropriate and equivalent alternative text into the Alternate text area. If the image is a complex image, enter a URL or browse to a web page to use for a longer description (longdesc attribute of the img tag). If nothing is selected for Long description, then the longdesc attribute is not added to the image. Alternatively, if the image does not convey content and does not provide page functionality,
can be selected for Alternate text to provide empty alt text (alt="").
Once the image has been added to the document, the alternative text can be added or modified by using the Properties panel.

As with the accessibility prompt, you can select
from the Alt drop-down menu to assign empty alternative text to the image. Longdesc cannot be added to the image using the Properties panel. To add longdesc to an image, either re-insert the image and complete the Long description area of the accessibility options or add the longdesc attribute to the image in the Code view.
Dreamweaver also provides an option for alt text for hotspots of client side image maps.
- Form labels
- Data table accessibility
With the accessibility options enabled, Dreamweaver will prompt for appropriate labeling information when form elements are added to your web page.
Simply type the appropriate form label into the Label dialog box. You can then select the label style: Wrap with label tag, Attach label tag using 'for' attribute, or No label tag. The best results are accomplished by selecting Attach label using 'for' attribute. This allows the form label to be moved to another position within the page and is most compatible with existing screen readers. You can also choose to position the form label before or after the form item. The Input Tag Accessibility Attributes dialog also provides options for specifying Access key and Tab Index, neither of which are necessary for accessibility and both of which are often misused.
To add labels to form elements already within a web page, there are three methods that can be used:
1. Delete, then reinsert the form element and add the appropriate label using the dialog box.
2. Add the appropriate label information in Code view.
3. Select both the label and the form element and select Insert > Form > Label. For this method to work, the label and the form element must be adjacent to each other. When this method is used, Dreamweaver surrounds the label and the form element with the label tags, which limits your ability to move the label and is not fully supported in all screen readers.
There are three principles involved in making data tables accessible to screen reader users:
1. Designate table headers
2. Assign a scope to row and/or column headers
3. For complex tables, assign headers and id attributes to header and data table cells.
Dreamweaver's visual interface supports option 1 (designating headers), partially supports option 2 (assigning scope), and does not support option 3.
Dreamweaver supports designating table headers in two ways. First, if the table already exists, you can identify table headers by selecting a table cell, row, or column, then selecting or deselecting the Header option on the Properties panel.
Second, if the accessibility options are enabled in the Preferences, a dialog box will be presented when the table is inserted. You can then choose whether the table has no headers (None), row headers (Left), column headers (Top), or row AND column headers (Both).
Dreamweaver will designate the correct cells as table headers using the <th> tag.
- Frame titles
If the accessibility option for frames is set within the preferences, Dreamweaver will prompt you for frame titles when a new frameset document is created.
The Title option should be a brief description of the frame contents or functionality. This information will be read by a screen reader to identify the frame. The Frame Tag Accessibility Attributes dialog will only be displayed if you create a new frameset document (File > New > Framesets) and will not display if you modify an existing document into a framed page (Modify > Frameset > Split Frame). You can also modify noframes content for the frameset document by selecting Modify > Frameset > Edit NoFrames Content.
