Adding a Picture to a Webpage |
|
| TASK
1
Find a Picture TASK 2
TASK 3
TASK
4
Check
it Out!
|
 |
Adding a Picture to a Webpage |
|
| TASK
1
Find a Picture TASK 2
TASK 3
TASK
4
Check
it Out!
|
|
TASK ONE -- Find a Picture
There are many websites on the WWW that offer
free graphics (pictures, cartoons, fonts, animated pictures and fonts,
etc) and there are many websites that offer these things for a price.
When you first start out making webpages, using the free graphics to "spice
up" your pages is a good choice. There are many copyright issues and laws
regulating the use of graphics not created by you, so to be safe (and fair
to the artists that create the images) you should only use images that
specifically state that they are for free use.
To find such a website, you can conduct a search on any search engine using the phrase "free graphics" or "free clipart" ...be sure to include the quotation marks around the words so that the search engine finds webpages with free graphics, not free something else. One search engine I like is Dogpile at http://www.dogpile.com since it is a multi, or meta, search engine that allows you to search over ten search engines at one time.
Of course another way to find the URL for a webpage with free graphics is to ask someone for such information. For today's exercise, I'll do just that to save you a little time. One website with free graphics for webpage use is presented by Ulead WebUtilities. At this site you can find galleries of free graphics files (you can only use .gif or .jpg graphics files on webpages). Open their page by going to http://www.webutilities.com/goodies/default.asp (you can keep this page open and open a new window with the new page in it by right mouse clicking on the link and choosing "Open in New Window" when the pop-up menu opens). Click on either the link to free animations or to free images and click through the pages until you find a graphic you would like ot put on your page.
TASK TWO -- Save the
Picture File
Once you find a picture you like, all you need
to do to save a copy of it is move your mouse arrow on top
of the graphic and click your right mouse button once. When the pop-up
menu opens, choose "Save Image As..."
Now a dialog box will open up on the screen similar to the one below.
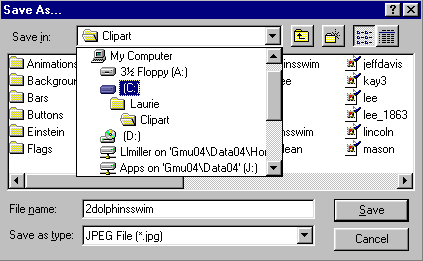 Move
your mouse arrow to the "Save in" rectangle and choose the drive you want
to save the image to (it's best to use a floppy so you can take the file
with you later). Move
your mouse arrow to the "Save in" rectangle and choose the drive you want
to save the image to (it's best to use a floppy so you can take the file
with you later).
You can also choose a directory to save the file into, as I did here. You can see that I am "in" the "Clipart" subdirectory within the directory "Laurie" on the hard drive in the example (C:\Laurie\Clipart\). The next thing to do is to name the file. If you look near the bottom of the dialog box you will see a rectangle labeled "File name." You can use the file name suggested or change the name. Either way, you should add the appropriate extension to the end of the file name. You will know which extension to give the file by looking at the "Save as type" rectangle. There you will see the file type with the extension in parenthesis--add that extension (including the dot) to the end of your file name. In the example, I would change the file name to "2dolphinsswim.jpg" |
Now your picture, or image, file will be saved on your floppy diskette (or wherever you chose).
TASK THREE -- Move
the Picture File to Your Mason Account
Now you need to move the file to your mason account
space. In other words, you need to transfer it to you mason account.
If you are using a Windows based PC, you can use a program called WS_FTP
to do this. If you are using a Macintosh, you can use a program called
Fetch
to
do this. Click on the appropriate program for your computer's operating
system to see directions about how to use it. NOTE: be sure to pick
the correct directory to put your picture file into. Your picture
file needs to be in the same directory on your account as the HTML file
(webpage) you want the picture to appear on. For example, if you want the
picture to appear on your homepage (HTML file name = index.html), you need
to put the picture file into your public_html directory.
TASK FOUR -- Add the
<IMG SRC> Tag to Your HTML File
Once your picture file is transferred over to
your mason account, you can add it to your webpage by adding an HTML tag
to the file for that page. After logging onto your mason account
using Telnet and opening the file in PICO, move your cursor to the place
where you want to picture to appear and add the following tag:
<IMG SRC="xxx.xxx"> where "xxx.xxx" is the name of the picture file
you just transferred over to your mason account. Save the file using
either the WriteOut command (^O) or the Exit command (^X).
TASK FIVE -- Check It
Out!
Go to Netscape and either open you webpage or
Reload it. You will see your picture on your webpage.