ECE 590 - Humanoid Robotics
Fall 2014
Term Project: The Tripod
Project Objectives:
Create a tripod walking robot using the Robotis Bioloid kit and DYNAMIXEL AX-12A servo motors. The goal is to demonstrate its capabilities via keyboard input to make the robot walk on three legs, turn left and right, and go backwards on command.
The Tripod:
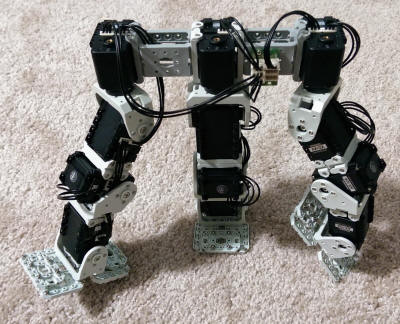
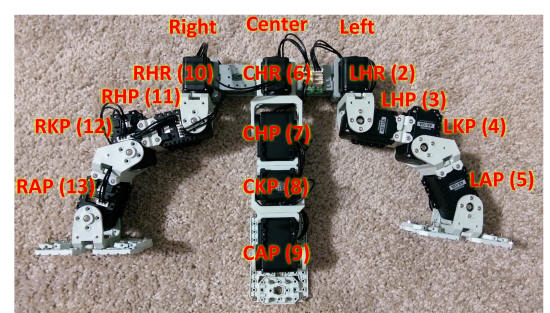
The Tripod robot consists of three legs installed in a line configuration with two outer legs (left/right legs) and one in the middle (center leg). Each leg is made of 4 servo motors acting as joints: hip rotation (xHR), hip pitch (xHP), knee pitch (xKP) and ankle pitch (xAP). The implemented joints and their movements are similar to their corresponding joints on a human leg.
Hardware Methodology:
Although the human leg has 6 degrees of freedom, the methodology used in the presented robot and its unique design enables it to perform the required tasks and keep its balance with only 4 degrees of freedom in each leg. The Tripod is designed to keep its center of mass inside its support polygon with standing on the center leg alone or only the two outer legs while performing different tasks at all time. This design enables the robot to not require tilting right or left to maintain its balance and only to focus on tilting forward and backward to stay upward and balanced.
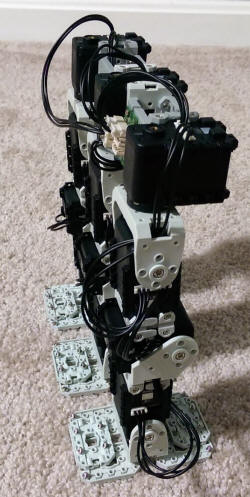
The forward and backward waking was implemented using a typical walk cycle with its different poses (servo motor angles) programmed to be sequentially executed on demand. The methodology behind the Tripod walk is inspired by the “Three-legged Race” where the left leg of one runner is strapped to the right leg of another runner. In this scenario the two outer legs mirror each other as one and the center leg acts as the other leg. Tripod pivots on the center leg while the outer legs are raised to turn left or right while maintaining its balance.
Software Methodology:
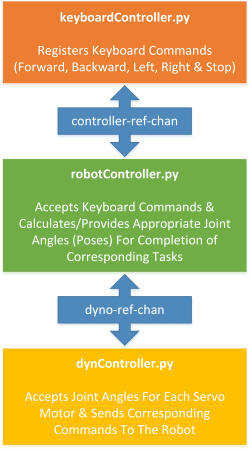
The robot is computer controlled via the keyboard and performs a single walking forward/backward and turning action once the corresponding key (arrow keys) is pressed. Once the action is finished the robot listens for the next command while standing still. The following block diagram shows the 3 main processes involved in controlling the robot and their corresponding responsibilities:
Installation & Operation:
The source code for this project is available on GitHub and can be downloaded from here.
To successfully operate this robot clone the above repository on your local machine. You must have a Linux environment setup with Hubo-ACH and DYNAMIXEL libraries configured correctly. If you are building your own robot similar to the one used in this project please assign the following IDs to the corresponding joints/servos:
This code assumes that your Serial-to-USB converter/controller for the AX-12A servos is located at /dev/ttyUSB1 and that you have all the required permissions set for this device. To operate the robot run runMe.py which would setup the channels and run the appropriate processes:
#!/usr/bin/env python

import os
import subprocess
import time

# Open the channles:
os.system("ach -1 -C 'dyno-ref-chan' -m 30 -n 30000")
os.system("ach -1 -C 'controller-ref-chan' -m 30 -n 30000")

pid = subprocess.Popen(args=[
    "gnome-terminal", "--command=python keyboardController.py"]).pid
print pid
time.sleep(1)


pid = subprocess.Popen(args=[
    "gnome-terminal", "--command=python dynController.py"]).pid
print pid
time.sleep(5)


pid = subprocess.Popen(args=[
    "gnome-terminal", "--command=python robotController.py"]).pid
print pid
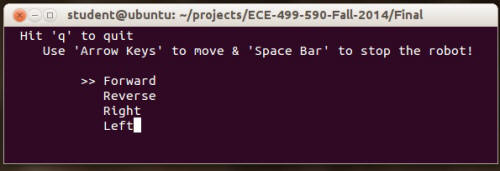
Use the arrow keys to control the robot:
