Basics of HTML
Hypertext Markup Language, otherwise referred to as HTML, is the standard language used for making websites. The language of HTML is made up of a character or characters enclosed by angled brackets. For the most part, HTML elements consist of two tags: an opening and a closing tag. The closing tag must always have a forward slash before its character(s). Content that will appear on your website is displayed between these two tags. An example of a standard HTML tag pair is shown below.
<div>CONTENT GOES HERE</div>
In some cases, as in the case of images and the doctype declaration, only one tag is needed. For more on images, visit the Images and Links page.
To begin creating code for your website using HTML, you must first specify the doctype with the following tag:
<!DOCTYPE html>
Using this doctype tells your computer browser that the following code is in HTML and that it should be read as such. (Specifically, the <!DOCTYPE html> tag tells your browser that the following code is in HTML5, which is the latest version of HTML and is currently supported by the most popular browsers.)
Next, your code must be enclosed by an HTML tag:
<html>YOUR CODE HERE</html>
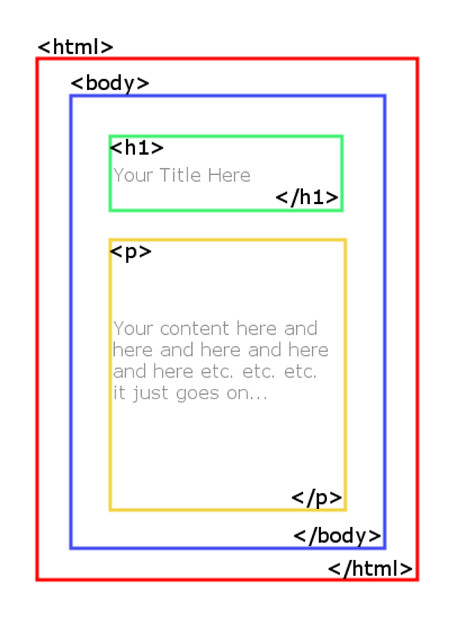
All the other tags for your website's code must go within these tags. For example, your next set of tags may consist of body content, including a header and a paragraph of text. A body tag will surround the header and paragraph tags, while the html tag will encompass all of these:

In this example, "h1" are the characters for header, and "p" is the character for paragraph. The content within the <h1>and <p> elements are written plainly: spaces, capital letters, and other basic element of writing appear without any formatting at all. (For a brief introduction to stylizing content on a website, visit the Basics of CSS page.
Here's a simple template that you might use for coding your website:
<!DOCTYPE html>
<html>
<head>
<title>Your Title Here</title>
</head>
<body>
Your content here
</body>
</html>
<html>
<head>
<title>Your Title Here</title>
</head>
<body>
Your content here
</body>
</html>
Other useful tags are as follows:
<h1> </h1> -- header tags. There are six levels of header tags: <h1>, <h2>, <h3>, <h4>, <h5>, and <h6>. <h1> is used for main headings. <h2> is used for subheadings. Each ascending number indicates a descending level of heading.
<p> </p> -- paragraph tags. By default, each paragraph within the paragraph tags will be shown on a new line.
<div> </div> -- divider tags. Like paragraph tags, the <div> tags divide content on a webpage. They can be useful for creating boxes and organizing layout.
<br /> -- break tag. If you insert this tag in between content, it will create a break in your content. You do not need two tags to use the break tag; its single tag functions as both.
<ol> </ol> -- ordered list. Creates an ordered list, like a numerical list, using <li> </li>.
<ul> </ul> -- unordered list. Like an ordered list, it requires the use of <li> </li>, but it does not create a hierarchy in the list.
<li> </li> -- list item. Each item in a list must be surrounded by a separate <li> </li> tag. These tags must be used within the <ol> tags or the <ul> tags to work.
Note: saving your HTML code
In order for your code to work online, it must be saved in a .html format before it is uploaded to a server. It is best to write code using a format-free application like Notepad or, better yet, Notepad++.
For more HTML help and tips, visit the Additional Resources page.
Graphic representation made by Bailey Lucero-Carter on GIMP.
