|
Creating a Directory for a WWW Site
Each student and faculty personal home page at GMU has a URL (Uniform Resource Locator) of this form: http://mason.gmu.edu/~username. Your web site pages and other files will exist in a subdirectory, named public_html, of your home directory. When the URL is given to a WWW browser, Mason will look for the subdirectory public_html and the file index.html (or index.htm) to open by default. It is this file that visitors to the site see first unless a different file is explicitly identified (http://mason.gmu.edu/~username/different.htm). You should plan on having the index.html file be your "front page" with links to many other pages (files on your site or other sites).
First you must create the directory public_html and set the permissions so others can access it. Follow the directions below. [If you find that public_html already exists in your account, see the bottom of this section.]
1. Log on to your Mason account.
2. Type each command exactly as it is written, followed by [Enter]. You do this only once. If you already have a web site on your Mason account or if public_html already exists, do not do this again.
| cd |
Changes current directory to your home directory. |
| cd .. |
Changes (moves up) to the general users directory of Mason (there is a space after cd). |
| chmod a+x username |
Changes mode (sets permissions) allowing everyone to enter your home directory (all, executable).
|
| chmod go-rw username |
Sets permissions forbidding anyone but you to read or write files in your home directory (group, others; remove read, write permission).
|
| cd |
Changes to your home directory. (Check by typing pwd.)
|
| mkdir public_html |
Makes a directory named public_html under your home directory. |
| chmod a+rx public_html |
Sets permissions allowing everyone to go into and read this directory.
|
|
chmod go-w public_html |
Sets permissions forbidding anyone but you to write files in the directory. |
| cd public_html |
Changes to this directory. |
When you are finished, change directory up to the user directory that contains your home directory and verify that the permissions attached to your home directory are drwx--x--x. For example, if your home directory is under u4, then go to u4, type ls -alp username. Verify that your public_html directory has the permissions drwxr-xr-x when you list the files in your home directory.
If the system has automatically made your public_html directory, be sure the permissions are as specified above. If they are not the same, change the permissions using the instructions in the table above.
To create a document file that can be interpreted by the WWW browser to display text and images in specified ways, hypertext markup language (HTML) tags must be inserted in the file. The < > symbols enclose the HTML markup tags and differentiate it from the text to be displayed in the browser. Almost every tag occurs in pairs: the first invokes the tag (e.g. <BODY>) and the second closes the tag (</BODY>). The closing is symbolized with a front slash, /. The text that is typed between the opening and closing tags is displayed in the browser according to the tags used.
The opening and closing tags that define the document as an HTML document are the "HTML" tags. There are two main parts within the opening and closing "HTML" tags, each defined by opening and closing tags: the "HEAD" and the "BODY". The "HEAD" contains information about the document itself and the "BODY" contains the document content. Note the hierarchy and nested positioning of the tags in the example below. The opening and closing "TITLE" tags are nested within the "HEAD" tags, which in turn are nested within the "HTML" tags.
The file, index.html, is frequently the "home page" and is the file a browser looks for and opens by default unless another file is specified in the URL. To create an index.html file, login to your Mason home directory on a terminal window:
-
Change to the directory public_html that you created previously. (Be sure you are in this directory!)
-
Type pico index.html. This command opens the pico text editor and creates the new file, index.html. (See this Manual for a list of pico commands.)
-
Type the following text in pico to create a very basic home page. (Type in your own name in place of Your Name.) It is best to use lowercase characters when typing tags since markup language is still evolving and uppercase characters might not be recognized in future.
<html>
<head>
<title>Home Page -- Your Name</title>
</head>
<body>
Your Name <br />
George Mason University<br />
Fairfax, Virginia
</body>
</html>
-
Press Ctrl-x to save the file, then type y for "yes". Accept the file name by pressing [Enter].
-
At the Unix system prompt, make the file "world readable" by typing chmod a+r index.html [Enter].
Now open a WWW browser (Netscape or Internet Explorer), type in your URL, and look at your home page!
[If you already have a home page, make sure it contains at least the elements specified above.]
If you cannot work on-line when you need to, you can still create and view your Web pages:
Use Notepad as your local PC text editor and type, or paste from another source, the HTML marked-up text. Save the file with the extension .htm or .html (the default home page must be index.html or index.htm). Open a Web browser and ignore any messages about there not being a connection and "work off-line", if that is a choice; if there is a connection, that is all right.
From the Firefox/Netscape menu bar, choose File | Open Page. Either type the path of the local file on your PC, or click on the [Choose File] button, find the file, and then click the [Open] button or press [ENTER]. In the Open Page box, click the [Open] button or press [ENTER]. The file should be displayed as a web page in the browser.
Or, you can drag the file icon from a Windows directory and drop it in an open browser window (either on or off-line).
When you are ready to upload the file to your Mason account, use an FTP program to transfer the file from your PC to the appropriate subdirectory in your Mason public_html directory (make sure you transfer files to the public_html directory and not to your home directory!). Until you upload the file to your Mason account, no one else can view it!
Remember to check the permissions on your file. Files should be -rw-r--r--
Note: On my Mason account, the default permissions settings when I create a file on-line (e.g. with Pico) are rw for the owner and - for everything and everybody else (-rw-------). If I create a new file on my PC, then upload it to Mason using SSH, the default permissions are -rw-r--r--. The permissions are thus set correctly for web viewing, but not if you want to keep the file private. If you download a file to your PC with permissions set the way you want them, and then upload the file to Mason, SSH will not change the permissions.
Make backup copies of your files that you create on your PC.
Download files you created on Mason to save on a PC and a portable storage medium such as flash dirve. Please maintain a backup copy of your entire Web site.You cannot recover deleted files from Mason. Please remember to take your flash drive to all Chem 350 classes.
Now what do you do? You need just a little more guidance on using markup tags to change the font size and color, to define the page's background color, to place graphics and links, and to design tables. With just a few simple markup tags, you can create a passable web page. Eventually, when you need to create a larger website, it is convenient to use the built-in browser editors or special Web editing and publishing programs to automatically insert the markup tags and perform formatting functions. Even with these aids, you need to understand the structure of an HTML page to correct the inevitable mistakes and deficiencies of these programs.
Here are two simple pages demonstrating the use of various HTML tags (html-ex.htm) and file links (link-files.pdf). For the html-ex.htm file, left click the hyperlink and you should see a web page full of Examples of HTML Tags. Print the page. With this page open, in Firefox/Netscape choose View | Page Source. Print the page. Or, if you are using Internet Explorer, choose View | Source. The file will open in Notepad. Print the file.
This document is an explanation of the representation of web page colors in hexadecimal notation (web-color-hex.pdf).
After you complete one or more tutorials, start looking "behind the scenes" of pages you admire. It has become more difficult in the last few years to see examples of simple HTML pages since more sites are calling up style sheets and Javascript that obscure the basic simplicity of HTML. Unlike the more sophisticated commercial sites, you don't need these features. Concentrate for now on simple HTML to achieve a design you like.
To see the marked up text for any page displayed in Firefox/Netscape, on the menu bar choose View | Page Source. Although there is no menu bar in the source window, you can still select text with your mouse and copy it by pressing [Ctrl]+C. You can then paste the text into your text editor (Pico or Notepad). In Explorer, choose View | Source. The source code is displayed in Notepad. You can save the text file directly to your computer.
You might find it helpful to keep such a page close by to experiment with as you build your pages. It can also be a template to copy and paste pieces you use often, such as table or body tags.
Additional pages you make (in a subdirectory of the public_html directory) will have the address form: http://mason.gmu.edu/~username/subdirectory/filename.htm. For convenience in transferring your html files between word processors and your Mason account, use the 3-letter extension htm.
Every new file must have the permissions set (chmod
a+r filename) as you did above for index.html.
Directories should have the permissions drwxr-xr-x.
Style Guidelines
If you are creating your first web site, please consider some of these style guidelines as you design and build your site. It's easier to start off with a clear organization, even though your site is small, than to try to straighten it out later. If you already have content in a website, make changes to it, if necessary, so that it conforms to these guidelines.
Your index.html file, which a web browser opens by default if it exists, should be a front page to the other pages on your site. My index.html file is such a page -- it identifies and links to the main categories in my site and to only a couple of important related sites. There are a few graphics and none is so large that it takes too long to load over a modem. It identifies who I am and how to contact me. I've tried to keep the page uncluttered and navigable.
Colors, font faces, and graphics are personal choices, but some colors seem to work together better than others. You might let existing web sites guide you in your choices. Your text should be easy to read against the background (please -- no red text on a dark background!).
A useful set of guidelines for what is generally appropriate in web publishing is provided by V. Montecino, a GMU instructor. There is a Web Development site sponsored by GMU that has specific information for the GMU community as well as copyright guidelines.
Developing a Web Site
Your Web site will eventually have many different elements incorporated into it and you want to be able to navigate through it easily. One way to help you decide how to organize your site is to find examples of what you like on the web. Commercial sites probably have too many advertisements and complicated layouts for you to copy. You might try MasonLink, Academics and browse through some of the department and faculty sites.
If you have already created a web site and want to retain it, please consult with me. There are different ways to handle it, depending on the complexity of your existing site. Regardless of the content of your existing site, you will need to have all of it organized into directories within public_html. Also, you will need to establish the elements specified below in your site.
These are the elements you should incorporate into your site now --you can always redesign your site as it develops, but these elements will demonstrate that you've learned some of the basics of HTML as we learned in class. The suggestions here are simple enough that you can develop a creditable site without using authoring software.
Front Page
In the beginning, I am asking you to develop a "Front Page" (index.html) similar to mine. A relatively small front page will load quickly (unless you use huge, slow graphics -- please don't) and should contain basic information about you and your site. Designing your site this way also helps you manage your files and directories as you create directories within public_html for each category on your front page.
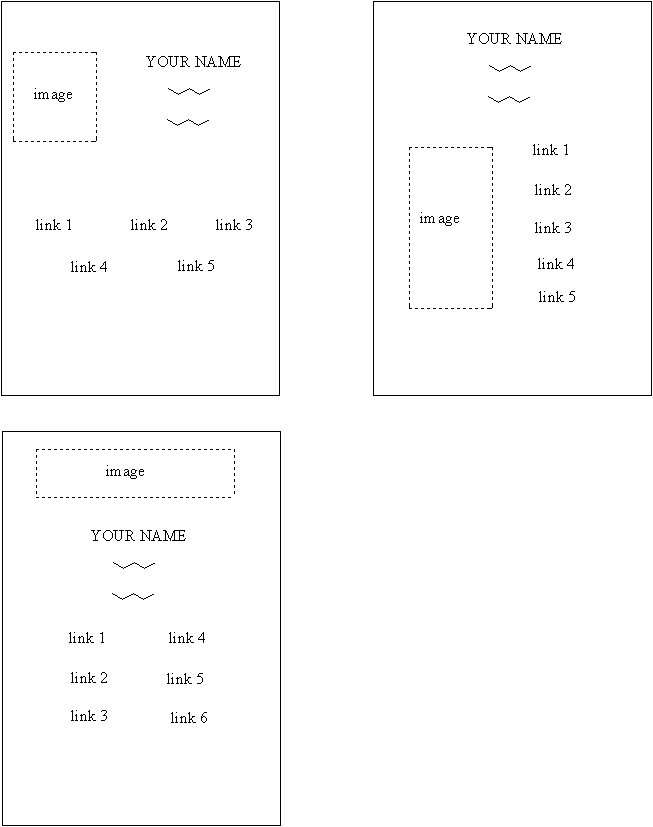
The front page should be designed so that all the text and images appear, ideally without scrollbars, on a medium resolution monitor. Carefully choose your background color or image and text/link colors. Some combinations are easier to read than others. If you use a background image, it should be understated and load quickly. The page appearance is best controlled using tables and so there should be at least one table on this page. Here are some basic layouts for you to consider.
Content and Links to include in the website
- On the Front Page
- your name prominently displayed in a header tag, and affiliation
- a "mailto" link to your e-mail address
- a medium size image that is science-related
-
links to these categories from the Front Page (in
no particular order):
- CHEM 350 Projects (the link goes to a page, projects.htm, in a new subdirectory projects )
- the CHEM 350 course web site
- GMU Sites (the link goes to a new page gmu.htm )
- off-campus sites (the link goes to a new page sites.htm)
- a personal page -- optional (the link goes to a new subdirectory
or page)
- define a background color, link color and title for all pages
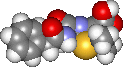
The science-related image must be somewhat prominent on your front page, but not so large that it takes a long time to load. It can be a photograph, graphic image, drawing, etc. of a molecule, instrument, process, whatever... (dogs, trees, etc. are not science related for this purpose). You can make your own image.
The content and links specified above are somewhat flexible, depending on your situation. Please ask if you have questions. The links to the subdirectories and pages can be text-linked or image-linked or some combination. At least one link must be image-linked. Organize the links in some rational order -- don't duplicate the order above. Within the front page and your linked pages, include at least two different font faces, sizes and colors. Include at least one example each of bold and italicized text.
Where new pages are specified above, begin a new web page, appropriately titled. Some links and information you can add immediately; other material will be added later.
- The GMU sites page should include
a link to Mason Link and to the Chemistry Department home page (if those links are not already on your front page).
You could also include a link to the registrar, the library, campus organizations
or other courses.
- The off-campus sites page should include a link
to the American Chemical Society, and could include other professional
societies, other universities, etc.
- You don't yet have any CHEM 350
projects; you will definitely be developing that page this semester
but you can construct it now.
- Your personal page can include information about yourself, photos, links to family and friends, non-academic pages such as weather.com, etc. This page is not required; make one if you wish to.
To make new directories, use either the UNIX commands in an SSH Shell session or in an FTP program. In general, the permissions for a file viewed on the web should be -rw-r--r--. The permissions for a directory should be drwxr-xr-x. (After this course is over, go back and remove the r permission for directories for g and o.)
Images and Permission
On your site there must be at least one image for which you have requested permission from the copyright owner and to whom you give credit. The science-related image on your home page might be it, or another image on another page. Here are guidelines for requesting permission and giving credit. While you are waiting for permission, use the caption "Permission requested from the copyright owner". Then give the name of the copyright owner and the site where you found the image. Hyperlink the site. Here is an example:
[IMAGE]
Permission requested from the copyright owner, S. W. Slayden http://mason.gmu.edu/~sslayden/
When you have received permission, replace "Permission requested..." by "Used by permission."
Please send me a BCC of your request for permission as well as forwarding a copy of the reply you receive. For the purpose of completing this part of the assignment, do not ask me or other faculty at GMU to use the image that satisfies this requirement (of course, you can use additional images).
All images used in your website must be stored on your site and the IMG SRC path must be a relative one. Do not link to images outside your site.
For the purposes of CHEM 350, do not use web authoring applications such as DreamWeaver or MS FrontPage. You are allowed to use Nvu in later parts of the course after you've finished the initial development specified here.
The university supports the open-source program NVu ("N-view") for creating basic web pages. See the Chem350 Courseware page for downloading.
Creating a Web page using NVu is much easier than typing in the HTML markup language in a text processor. As your web site becomes more complex, you might find it easier and faster to use this simple but powerful dedicated HTML editor, or as we'll see, occasionally convert MS Office documents and spreadsheets to HTML files. However, all of these methods have limitations and you'll need to troubleshoot or make enhancements on your pages and you need to know basic HTML to do that.
Since NVu is a Windows application, the tools and menus should be somewhat familiar to you. You can do the usual things with Composer just as you do with a typical, but limited word processing program. You will recognize some of the special HTML markup capabilities in the toolbar, such as Link and ordered and unordered lists. You apply these formatting features to the text you type in the window. You can also insert images, construct tables, etc.
A convenient feature is that you can easily switch back and forth between the editing window, a Preview window, and the source window by clicking on a tab at the bottom of the Composer window. Not only can you start a new page in Composer, you can also open an existing page and edit it in Composer.
While you are still learning the basics of HTML and using NVu, do not use Cascading Style Sheets. In NVu, choose Tools | Preferences... | General. Under CSS Editing, uncheck the box "Use CSS styles..."
Although you can transfer your file to Mason using the FTP utility in Composer, it is easier and surer to upload using an FTP program such as SSH-FTP.

Start experimenting with this editor to make your web site authoring easier. You can refer back to other on-line help sources.