|
If you are new to the Windows environment, or if you need more practice, you might want to begin with an on-line overview of Windows. There are now so many versions of Windows that it is impractical to give instructions for each of them here. The main features are similar enough that you can be familiar with one and work in any of them. Neither the university nor this course supports Windows Vista.
Now that Windows 7 has been released, from time to time this chapter will be updated with instructions specific to the new operating system.
Help and Support
At the Windows Desktop, find the Taskbar at the bottom of the monitor screen. If you don't see the Taskbar, move the mouse to the bottom of the screen and the Taskbar should appear.
![]()
Click the left mouse button on the Start button at the far left of the Taskbar.
Click on Help and Support (WinXP) in the pop-up menu.
Under "Pick a Help Topic", choose "Windows basics".
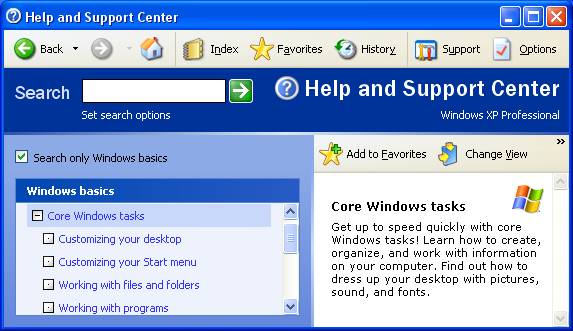
Select and left-click on Core Windows tasks. Make sure you can perform the tasks that are explained in the topic Working with files and folders. You should also explore the other topics, especially regarding computer security.
Select and left-click on Searching for information. Make sure you can perform the tasks that are explained in the topics See what is on your computer and Search for a file or folder.
You can close the window by clicking the x button at the top right of the Window title bar.
These are some of the skills you should be able to demonstrate using Windows:
- Use the Start button to find programs such as Help, MS Word, Excel, etc. and open them.
- How to access and open My Computer, Windows Explorer (in Folders view), and Control Panel.
- Open, maximize, minimize, resize and close windows.
- Right-clicking to access pop-up menus.
- How to switch between open applications using Alt-Tab.
- How to view the Properties of an icon or a file by right-clicking.
- How to rename an icon or a file.
- Create Shortcuts to programs
- Open a file in a specific application without double-clicking the file
- Use Search to find files.
- How to use the windows, boxes, and buttons in a dialog box.
- Cut/Copy/Paste from or into just about anywhere.
- Understand the directory (folder) and file structure in the window; change the View of the window contents; rename, copy, and move files and folders on the same drive and to another drive.
Visible File Extensions
Many users prefer to see the file extensions when listing files in My Computer or Windows Explorer. If you see only file names and no extensions such as .doc or .htm, you can change the default display. From the menu bar in either My Computer or Windows Explorer, choose Tools | Folder Options. Click on the [View] tab. Make sure there is not a checkmark in the box "Hide extensions for known file types".
Make sure you can open an application first, then open the file from within the application. It is not always sufficient to double-click on a file icon and expect the correct application to load and open the file. Sometimes two applications open files with the same extension.
The procedure for making file extensions show in Vista and Windows 7 is similar to that for Windows XP.
Once you open any Windows Explorer window (e.g., Documents or any other) there are three basic steps: 1) Click on the Organize button. 2) Select the Folder and Search Options menu item. 3) Take the View Tab and scroll down the list to the Hide extensions for known file types item and uncheck it. |
Screen Capture and Printing
Use these instructions whenever you need to capture the contents of a window or monitor or can't print directly from a program. You can take a "screen shot" of only the active window (any size) or capture everything showing on the monitor.
- Press the [Print Screen] key on the keyboard. This action will capture a copy of all the graphics on the monitor and place it on the "Clipboard". If you press the [Alt] and [Print Screen] keys simultaneously, you will capture the graphics for the active Window only.
- Open Paint (or other graphics editor) and maximize the Window. Choose Edit | Paste. The contents of the"Clipboard"should now appear in the Paint area. Choose File | Save As, and enter a file name and choose the desired file type (.gif, .jpg, .bmp, etc.).
- Choose File | Print Preview. If the graphics occupy more than one page, close the preview and choose File | Page Setup and click on Orientation Landscape. The graphics should now fit one page. Click OK. When the graphics occupy only one page, choose Print | OK from Print Preview or choose File | Print | OK.
Resizing the Canvas in Paint
Often, the "canvas" size (white area) that appears when you first open Paint is not the same as the image you intend to paste there. If the canvas is smaller than the image that is pasted, the canvas automatically resizes to accommodate the pasted image. When you paste an image on a canvas that is too large, the graphic file that is saved includes the white space.To resize a too-large canvas before pasting, grab the handle at the bottom right of the canvas and drag upward so the canvas becomes smaller than the image. Then you can paste the image -- the canvas will become the same size as the image. To resize after pasting, grab the handles at lower right (and/or on the right side or bottom) and move the canvas to the edge of the image. Unless you are very precise, though, a bit of canvas will still show.
Graphic File Formats
This site (http://www.ransen.com/Articles/Formats/Image-Formats.htm) has a good explanation of the file formats commonly used on the web. You should be able to make the appropriate choice of graphic format.
Image File Properties
It is sometimes useful to know the size of a graphic. The Windows Paint program can give you that information. With a graphic open in the Paint window, choose Image | Attributes... The pop-up window tells you the size of the file on disk and gives the measurements of the graphic in in., cm., or pixels. When you construct your website, you will want to know the size in pixels.
In Firefox: If you right-click an image on a web page, choose to View Image. The image then opens on a new page. Again, right-click on the image and then choose Properties. The width x height information appears in the pop-up window.
In order to activate your Mason Cluster account you need to know your GMU ID number and your PIN number. If you have forgotten your PIN number, call 993-2441.
These directions will allow you to request a new computer account or reset a password for your existing computer account if you have been locked out. When you choose a password for your account, choose one that is easy for you to remember but difficult for others to guess. You may use any combination of numbers and letters (upper- and/or lower-case) from 6-32 characters in length.
Mason Cluster commands are case-sensitive, so upper- and lower-case letters are not interchangeable.
- Go to the web page
http://mason.gmu.edu/.
Choose to get a Mason account and click on the link.
- After providing
the requested information, press the Change Password
key (this is the only choice, but it will also activate your account).
- Follow the instructions that appear on the screen.
If you forget your password, you will need to repeat these instructions.
For more information, call the UCIS Support Center at (703) 993-8870.
NOTE: The password that is generated for your Mason account is different from the password that is generated when you receive your MEMO e-mail account or the one you use to access Patriot Web. Do not attempt to log in to Mason using your e-mail password.
- In an internet browser, type http://masonlive.gmu.edu
in the Location: (or Address) box and press [Enter].
- You can connect directly by entering the address http://www.outlook.com .
- For more information, go to the FAQ page or click the link http://masonlive.gmu.edu/faqs.html#Purpose_of_account
- You can forward e-mail from other accounts to your MasonLive account, or you can forward e-mail from MasonLive to another account and to mobile devices
Many of us have other non-Mason e-mail accounts that we use for various purposes. For Chem 350, we will use our Mason accounts. You can forward e-mail from your Mason account to your other e-mail accounts. See the "Internet Applications" chapter in this manual.