Chapter Overview:
This chapter discusses basic video editing techniques for iMovie (Mac).
Although the actual footage one collects is important, it is the good video editing that one does that can make or break the story!
iMovie for the Mac and Windows Movie Maker for the PC are the free softwares that are usually installed on a person's machine. Basic video editing techniques for the Mac will be discussed.
MAC USERS/iMOVIE
One the program is initiated the first step is to import the video file from the camera.
- Use a FireWire/USB cable to connect your video camera to your Mac and then turn on your video camera to playback mode.
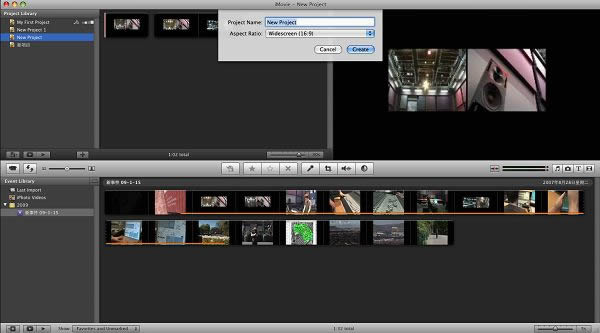
- Create Project/New Project by going under the File menu and type a name for your project.
- Rewind to where you want to start importing by using the playback controls
- Click the import button and clips will appear in the iMovie Shelf. Save your project.

Arranging Clips:
-Right now, the Shelf section should be full of clips and the Viewer section should be empty.
-Drag the footage you want to use in the Viewer section. It's a good idea to copy the clips from the Shelf section, so that you will have a back up copy in case something you do in the Viewer section is something you end up not wanting. You have the option of going back and starting from the original clip.
Timeline Viewer:
-Clicking the timeline viewer will show the clip's length in minutes/seconds
-You can use the scrubber bar (blue mark) and crop markers (two tiny triangles) to point to where you want clips to start and stop.
-Once you have your clips edited to the way you want them to be, you can start working with the audio.
Audio:
-iMovie allows you to adjust audio levels for the entire clip or any section of the clip you want to be louder or quieter. Click on View followed by Show Clip Volume Levels.
-Side Note: Video footage with lots of noise should use voice overs. Lower the noise so that it does not interfere with the narrated information.
-You can also record a voice over (using narration). Click on the Media tab on the iMovie interface, click the red button when you're ready to record.
-To import audio, such as a music file to video, is easy as long as it's an MP3 and is already imported into your iTunes prgram. Click on Media button and select the track.
Transitions:
-Transitions are hardly used in news videos (hard cut). However, to use transitions select the clip that you want the transition to start from and click on the Editing tab followed by clicking on transitions.
Titles:
-To identify speakers in your videos
- Select the clip where you want to add the title
- Click on the Editing tab, then click Title, in which a menu of title styles appears. Select the title style you prefer and enter the textual information into the box.
- You can modify the font, the effects, and the color.
- Choose the Over Black button so that your title will appear on a black background rather than being inserted over the video.
- Check the QT Margin box, since your video will essentially be exported as a QuickTime movie. This will allow the title to fit in the margins of the QuickTime movie.
Grabbing Screenshots:
-You can capture a still image to promote your video package. Select a spot in the video by moving the playhead to that location. Under the File menu, select Save Frame As. Choose JPG from the Format menu and click Save.
Exporting Video For The Web (FINAL STEP):
-Export video for online publication.
-Export format will be QuickTime because you are using iMovie.
-Under the Share menu, choose QuickTime. Choose web or web streaming.
-File size should be no more than 1MB for each minute in length.
~All information taken from "Journalism 2.0"
~Pictures From google.com