SSH (Secure Shell) Telnet
and FTP
SSH Secure Shell
Telnet and FTP (file transfer protocol) provide more security for transferring
data because of an encrypted link between client and server computers.
See
how to get and install the program on your own PC
at the end of these instructions.
Program Options:
You should
see the two options below on your Windows "Programs" menu for Secure Shell
(SSH):

Use Secure Shell:
1. Double click
the SSH Secure Shell desktop icon (or from your Start menu,
select Programs, then select
SSH Secure Shell.)
2. When dialog
box appears, press ENTER.
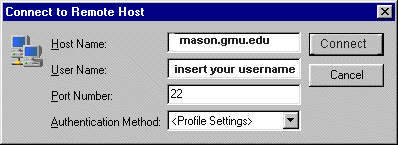
3. In the Connect
to Remote Host dialog box :

Type
the following:
1. In the Host
Name field, type mason.gmu.edu
2. In the User
Name field, type your mason username (without the @gmu.edu
extension).
3. Click Connect.
4. If the Host
Identification box appears, click Yes.
(Note:
The
Host Identification box will appear only if this is your first time logging
into the mason server.
5. After you "Connect," you will see an "Enter
Password
dialog box.
6. Type your
mason
password (which may or may not be the same as your email passsword).
7. Click OK.
8. In the next
box, the mason prompt (mason.gmu.edu) should appear.
9. You can
now work directly with your account to telnet into your mason directory
to create folder/directories, edit files, set file permissions.
Use Secure FTP (to transfer
files):
1. Open SSH
Secure Shell.

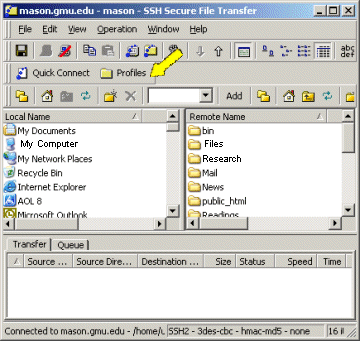
2. Select the
Profiles
(see illustration above) icon on the menu bar.
3. Select Add
Profile from the list.
4. Type the
name of your profile in the field (for example mason).
5. Select the
Profile
menu again.
6. Select Edit
Profiles.
7. Select the
tab labeled
Connection.
8. Enter mason
(or osf1) in the field labeled Host name.
9. Enter your
username in the field labeled User name.
10. Leave all
other tabs and fields to default settings.
11. Click on
OK.
12. Select
the
Profile menu again, select your profile mason from the
list.
13. If the
Host Identification dialog box appears, click Yes.
(Note:
This dialog box will only appear if you have never logged into mason.gmu.edu
before).
14. Click OK
on Message from the server window.
15. In the
Enter Password dialog box, type your mason password. You will see
a split screen.
---The left
side shows files that are on the PC you are working on (local
name).
---The right
side
shows files that are in your mason account in your "home"directory
on the mason server.
(You can change which side is local and which is
remote; however, generally, the left side is local.)
Set Permissions (See
graphic for setting permissions.):
1. Select
the "Edit" menu and click "settings"
2. Expand "Global
Settings" on the left hand side of the screen.
3. Scroll down
to "File Transfer" click on "advanced"
4. Uncheck
the box labeled:"Preserve original destination permissions"
on the right hand of the screen
5. To save
settings for future and current sessions, click on the "OK"
button ( bottom of window).
Upload Files
from Hard Drive to
your Mason server account:
1. Highlight
the file in the local (left) column that you want
to transfer.
2. Drag
and drop it to the remote (right) column.
3. The file
will appear on the list on the right (in your account on the mason
server).
Download Files from
your Mason server account to a Hard Drive:
1. Highlight
the file in
remote (right) colum that you want to
transfer, then
drag and drop it to the left hand local
column.
2. The file
will appear on the list on the left (on your PC).
To End Secure Shell session:
1. At the mason
server prompt, type exit and press the Return key. You are
now logged out from the mason server.
2. Select
Quit to exit the Secure Shell program. This is important to prevent
access to your files.
Get
Secure Shell:
1. On the Web,
go to http://itusupport.gmu.edu/
and click on "Downloads."
2. Select Secure
Shell
3. Save the
file on your computer. (Remember where you saved it!)
Install Secure Shell:
1. Double click
on "SSH" icon.
2. When the
Install Shield Wizard dialog box opens, click Next.
3. Read the
License Agreement and then click Yes.
4. Select the
default Destination Folder and then click Yes.
5. Select the
default Program Folder and then click Yes.
6. Select all
four remaining components and then click Yes.
7. In the subsequent
Install Shield Wizard dialog box, to complete installation click Finish
After you install
the program, the SHH Program, you should see these two options on your
Windows "Programs" menu for Secure Shell (SSH):
--- Secure
File Transfer Client
--- Secure
Client Telnet
(See graphic
above under "Program Options."
   
|

